🎯 What is Circuit Breaker Pattern?
Circuit Breaker Pattern in Software Development is a design pattern which is analogous to MCB(Miniature Circuit Breaker) switches in electricity wiring at our home. When there is flow of excessive current, the MCB switch trips and disconnects the circuit preventing electrical faults and electrical equipment failure.
The Circuit Breaker Pattern says that there is a proxy present in your application via which call to the other entity is being made. If there is a huge latency in getting response from this other entity, or if the entity is not available all together, then this proxy disconnects the route and prevents clients from making call to this other entity.
Here, the other entity can be a service within your own application or some other external service.
If there is a delay in getting the response in the synchronous call, the thread making this call has to wait. Imagine several other threads staying blocked for the same reason. This invites high resource usage which doesn’t yield anything fruitful. In such scenarios, it becomes an obvious choice to handle it properly. We can plug in something via the proxy, like an alternate route, which will respond when there is fault in the application flow. The proxy will stop routing the call to faulty entities and will trigger the alternate route to handle this fault. This ensures that our costly resources are being utilized properly.
Circuit Breaker Pattern incorporation becomes matter of utmost importance in micro service architecture where we can have several other external and internal services to make call to.
In such a distributed state of application, we must incorporate circuit breaker in our applications.
🎯 Circuit Breaker Implementation
There are several implementation present right now which you can use in your applications for circuit breaker. Making use of one of the implementation in your projects prevent you from re-inventing the wheel as you don’t need to write the implementation yourself, somebody has already done that for you. And with popularity and good community support available for that implementation, you are rest assured that you will be getting security fixes/updates for them on time.
Hystrix and Resilience4j are two such popular implementation available to us. In this post I will be making use of Resilience4j annotations with Spring Boot to demonstrate the implementation of Circuit Breaker Pattern.
🎯 Resilience4j
Resilience4j is a Java library that helps us build resilient and fault-tolerant applications. It provides a framework for writing code to prevent and handle such issues.
Resilience4j is a lightweight fault tolerance library inspired by Netflix Hystrix, but designed for Java 8 and functional programming. Resilience4j provides annotations and higher-order functions (decorators) to enhance any functional interface, lambda expression or method reference with a Circuit Breaker, Rate Limiter, Retry or Bulkhead.
🎯 Resilience4j States
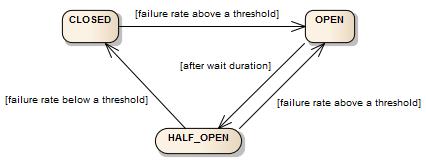
Resilience4j has three states:
- Closed: When resilience4j is in closed state, it means there is no fault in the application flow and method calls are getting routed via the proxy properly as expected.
- Open: In open state, call to faulty service is prevented, and call goes to the fallback method always.
- Half Open: It is an intermediary state which is in between open and closed states. Before moving to open or closed state, circuit breaker stays in half open state. In this state all the comparison with resilience4j configured values(like failure rate threshold, wait time etc) are done to see whether the circuit can be moved to
closed()or toopen()state.
🎯 Integrate Resilience4j in Spring Boot Project
We will be adding below dependencies in pom.xml of our Spring Boot project.
<!-- Spring Boot Starter AOP is required for Resilience4j Spring Boot to work -->
<dependency>
    <groupId>org.springframework.boot</groupId>
    <artifactId>spring-boot-starter-aop</artifactId>
</dependency>

<!-- Resilience4j Spring Boot 2 support via Annotations -->
<dependency>
    <groupId>io.github.resilience4j</groupId>
    <artifactId>resilience4j-spring-boot2</artifactId>
    <version>${resilience4j.version}</version>
</dependency>
We need to have Spring AOP present in the classpath. If not, then circuit breaker won’t work. This is so because while implementing resilience4j with annotations, it internally makes use of Spring proxies. In the example here I will be using annotations.
The resilience4j-spring-boot2 version I will be using is 1.7.0.
<resilience4j.version>1.7.0</resilience4j.version>
🎯 Implementation using Annotations
For the implementation, I am going to use a very simple use case. The caller method will make call to another method which will throw RuntimeException. Our circuit breaker implementation will keep an eye on this method throwing exception, and in case there is any exception it will provide a fallback route which will get executed when there is an exception.
This is a very simple use case. But it gives you an idea how to bind the circuit breaker implementation to guard your methods and provide a fallback route.
@CircuitBreaker(name = "serviceCircuitBreaker", fallbackMethod = "fallbackService")
public void runService() {
    LOGGER.info("Printing from ResilientService.runService()");
    throw new RuntimeException("Some RuntimeException occurred!");
}

private void fallbackService(RuntimeException runtimeException) {
    LOGGER.info("Printing Fallback for Resilient Service");
}
The method runService explicitly throws RuntimeException. You tie the resilience4j circuit breaker instance to it using @CircuitBreaker annotation.
It takes in field called name which assigns a name to your circuit breaker instance.
It also takes in field called fallbackMethod which is the name of the method which will be executed as a fallback method when there is some exception from the method.
Note that the fallback method needs to take in the type of exception argument which will be thrown. Here, we have RuntimeException which we want to guard on and that is why our fallback method has RuntimeException parameter. If there is any other exception thrown, which is not a RuntimeException, then this fallback method won’t get executed.
Suppose the method runService() throws some another exception which is not a RuntimeException, for example say a custom exception called ServiceCustomException, then we would need to introduce another fallback method with ServiceCustomException as the parameter, to handle this exception in fallback. So in this case, we will have two fallback methods, one for handling RuntimeException, and another one for handling ServiceCustomException.
@CircuitBreaker(name = "serviceCircuitBreaker", fallbackMethod = "fallbackService")
public void runService() {
    LOGGER.info("Printing from ResilientService.runService()");
    throw new RuntimeException("Some RuntimeException occurred!");
}

/* For handling RuntimeException if thrown from runService() method */
private void fallbackService(RuntimeException runtimeException) {
    LOGGER.info("Printing Fallback for Resilient Service, for RuntimeException");
}

/* For handling ServiceCustomException if thrown from runService() method */
private void fallbackService(ServiceCustomException serviceCustomException) {
    LOGGER.info("Printing Fallback for Resilient Service, for ServiceCustomException");
}
You can also club retry, rate limiter, bulkhead patterns with circuit breaker. Below I have shown you an example of clubbing the retry in the circuit breaker.
@CircuitBreaker(name = "serviceCircuitBreaker", fallbackMethod = "fallbackService")
@Retry(name = "retryService")
public void runService() {
    LOGGER.info("Printing from ResilientService.runService()");
    throw new RuntimeException("Some RuntimeException occurred!");
}
We have configured Retry and CircuitBreaker on this method.
Idea is to try ‘Retry’ first for the configured number of times. If even after retrying this for the configured number of times we continue to get exception, then circuit breaker will come into action.
Now, if things are clear so far then let’s move further and see the resilience4j configuration.
🎯 Resilience4j Configuration
I have used following configuration values for resilience4j circuit breaker
#Resilience4j Retry specific configuration goes below
resilience4j.retry.retryAspectOrder=2
resilience4j.retry.instances.retryService.maxRetryAttempts=3
resilience4j.retry.instances.retryService.retryExceptions=java.lang.RuntimeException
resilience4j.retry.instances.retryService.waitDuration=1s

#Resilience4j CircuitBreaker specific configuration goes below
resilience4j.circuitbreaker.circuitBreakerAspectOrder=1
resilience4j.circuitbreaker.instances.serviceCircuitBreaker.waitDurationInOpenState=3s
resilience4j.circuitbreaker.instances.serviceCircuitBreaker.permittedNumberOfCallsInHalfOpenState=3
resilience4j.circuitbreaker.instances.serviceCircuitBreaker.slidingWindowType=COUNT_BASED
resilience4j.circuitbreaker.instances.serviceCircuitBreaker.slidingWindowSize=2
resilience4j.circuitbreaker.instances.serviceCircuitBreaker.failureRateThreshold=30
circuitBreakerAspectOrder has been set to 1, and retryAspectOrder has been set to 2. By default, the retry mechanism has lower priority and hence it warps around the circuit breaker aspect. By doing this change, we gave higher priority to retry.
So with this, we will retry first for the configured number of times, and if retry limit is exhausted then circuit breaker will come into action with its configuration.
failureRateThreshold is the percentage of failure that resilience4j is witnessing, at which the circuit breaker will move to open state.
Most of the configuration values are self explanatory as per their key name in the properties file. You can find more information on resilience4j configuration values over here.
🎯 Conclusion
This post gives you a basic idea on what circuit breaker is, and how we can implement that in our projects using resilience4j. In this post, I used resilience4j implementation using annotations. In the next post I will discuss implementing the same using decorators. And in that approach spring proxies will not be used.
All the code changes that I shown in this example are present in my GitHub repository.